ESP32 Web Server (IoT Home Automation)
Apne home appliances ko local network se control karne ke liye ek custom Web Server banayein using ESP32 NodeMCU.
Welcome to the ESP32 Web Server Tutorial! Is guide mein hum seekhenge ki kaise aap ek simple web dashboard banakar apne lights aur appliances ko browser ke through control kar sakte hain.
Project Overview
Hum ek local web server host karenge ESP32 par jo HTML/CSS page serve karega. Is page par buttons honge jisse relay module control hoga.
Quick Specs Table
ESP32 NodeMCU ki technical specs jo is project ke liye important hain:
| Specification | Value | Details |
|---|---|---|
| Microcontroller | Tensilica 32-bit Dual-Core | Fast processing aur multitasking ke liye |
| Wi-Fi Range | ~50-100 meters | Standard home router compatibility |
| Operating Voltage | 3.3V | Input pins strictly 3.3V logic supply follow karte hain |
| GPIO Pins | 36 Pins (with PWM/ADC) | Sensor aur relay control ke liye sufficient pins |
| Flash Memory | 4MB | Embedded HTML and CSS files store karne ke liye |
Note: Make sure aapke laptop/phone aur ESP32 dono same Wi-Fi network se connected hon. Agar network different hoga, toh IP address access nahi hoga.
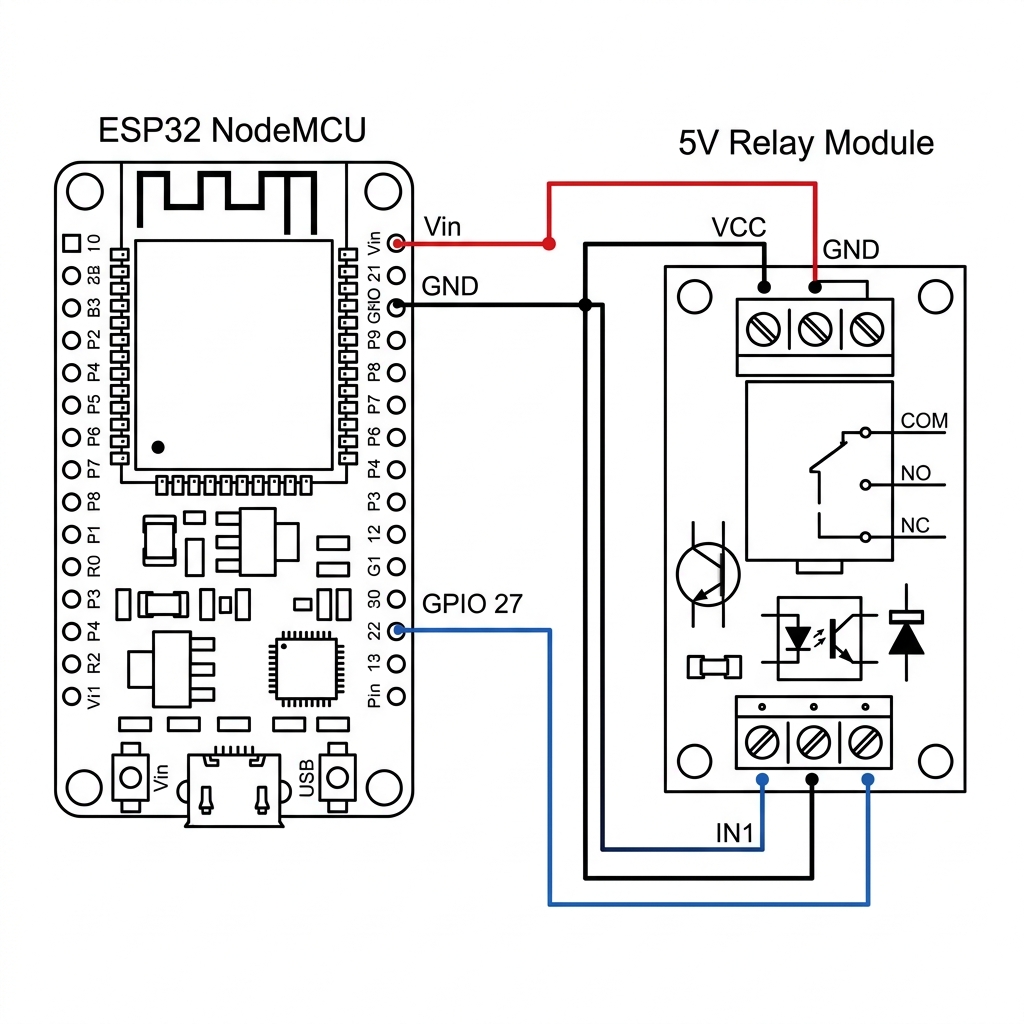
Wiring & Connections
Relay module ko ESP32 ke saath connect karne ke liye niche diye gaye steps follow karein:
- ESP32 Vin ➡️ Relay VCC (5V Supply)
- ESP32 GND ➡️ Relay GND
- ESP32 GPIO 27 ➡️ Relay IN1 (Control Signal)
Warning: AC Mains (220V) ke saath work karte waqt extreme caution bartein. Relay connect karne se pehle primary power line ko turn off kar dein.
Video Tutorial
Agar aapko step-by-step wiring aur live demo dekhna hai, toh ye video guidance follow karein:
Arduino Source Code
Niche diya gaya code custom web server host karega aur GPIO 27 par control signals pass karega:
#include <WiFi.h>
#include <WebServer.h>

const char* ssid = "YOUR_WIFI_SSID";
const char* password = "YOUR_WIFI_PASSWORD";

WebServer server(80);
const int relayPin = 27;

void handleRoot() {
  String html = "<html><body><h1>ESP32 Home Automation</h1>";
  html += "<p><a href=\"/on\"><button>ON</button></a></p>";
  html += "<p><a href=\"/off\"><button>OFF</button></a></p>";
  html += "</body></html>";
  server.send(200, "text/html", html);
}

void handleOn() {
  digitalWrite(relayPin, HIGH);
  server.send(200, "text/plain", "Relay ON");
}

void handleOff() {
  digitalWrite(relayPin, LOW);
  server.send(200, "text/plain", "Relay OFF");
}

void setup() {
  Serial.begin(115200);
  pinMode(relayPin, OUTPUT);
  digitalWrite(relayPin, LOW);

  WiFi.begin(ssid, password);
  while (WiFi.status() != WL_CONNECTED) {
    delay(500);
    Serial.print(".");
  }

  Serial.println("\nWiFi Connected!");
  Serial.print("IP Address: ");
  Serial.println(WiFi.localIP());

  server.on("/", handleRoot);
  server.on("/on", handleOn);
  server.on("/off", handleOff);
  server.begin();
}

void loop() {
  server.handleClient();
}
Line 4 aur 5 ke variables mein apna SSID aur Wi-Fi Password configure karna na bhoolein.